As a statistician, learning the basics of website construction is painful and time-consuming. To build a website without such knowledge, one option is to use an online webpage builder such as Wix and WordPress. Such online builders are easy to use, but there are deficiencies:
- You usually need to pay monthly to get rid of the logo or ads provided by the builder.
- You may have to pay more to use a customized domain, such as
your-name.com. - It is hard to insert code snippets or formulas. Just imagine doing that in Word.
- It is hard to add the function you want.
To avoid payment and save time, I switched to another option: Blogdown, recently developed by Yihui Xie, Amber Thomas, Alison Presmanes Hill. The advantages of Blogdown, especially for R users, are obvious:
- Everything is done in Rstudio.
- Free.
- You can write your blog or post through
Rmarkdown, which is compatible to R programming and math environment. - You pay a small amount of money to use a customized domain. (I paid $7.99/year for using
bingkaiwang.com.) - With GitHub, once you push a change, it will show on the webpage immediately.
In this article, I will give an overview on how to construct a website using Blogdown. A detailed and well-written tutorial of Blogdown can be found here.
1 Build your website using Blogdown
1.1 Prerequistes
To use the R package Blogdown, here is some knowledge you need to know:
- basic Rstudio programming,
- R markdown,
- (recommended) GitHub.
If you are familiar with all of above, then you are ready to start!
1.2 Steps to build a website
Open Rstudio and install required packages by
install.packages("blogdown")andblogdown::install_hugo().Make sure your Rstudio version is at least v1.1.383. Then create a website project from the menu
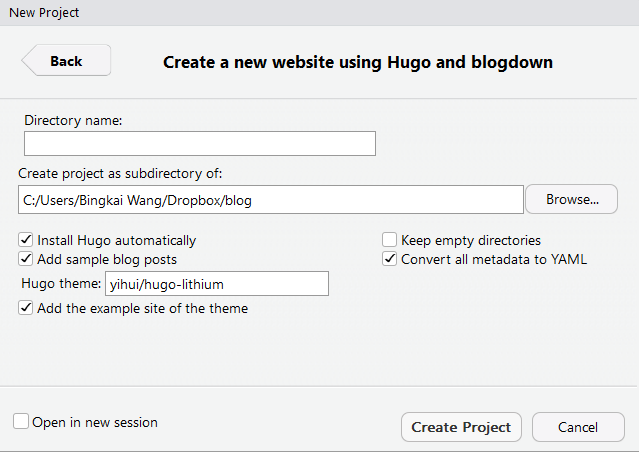
File -> New Project -> New Directory. In the next step, selectWebsite using blogdown. In the next step, choose the directory, give a directory name and click “Create Project”. (Notice that the default theme is “hugo-lithium”.How to use others themes is introduced in the next section.)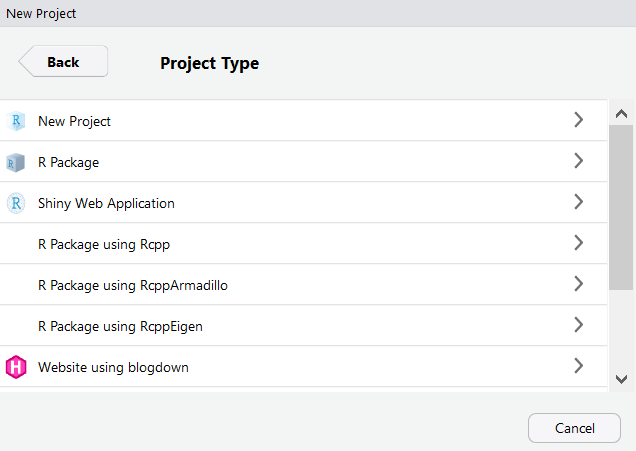
Once you create your project, you will find a bunch of files and folders in this directory. Don’t worry, since you will only care about the following three:
config.toml, which contains the global option of the current website.content, which stores all your materials, such as your CV and posts.static, which usually stores images and videos.
Follow the instructions given by the theme to change options inconfig.tomland add content in the sub-folder ofcontent. For example, you can create an Rmarkdown file incontent/postand save it when you finish. Different themes have different structures and formats. You need to figure out yourself where to add posts and the meaning of parameters.
- Use the command
blogdown:::serve_site()to run your project. You will see the website in the “Viewer” window. You only need to run this command once and all changes after that will be automatically synchronized.
1.3 Change the theme
A theme, or called “Hugo theme”, is basically a template for building a website. Given a theme, what’s left is just adding your materials. Aside from the default theme, there are a lot of themes available here for different purposes.
To use a different theme, you need to find the GitHub repository for that theme and specify it when creating the website project. For example, I used the “Academic Theme”, whose GitHub repo is gcushen/hugo-academic. In the GitHub repo page, a documentation file is usually given. Not all of those themes have the function you desire. In this case, just go for another one and read the documentation.
2 Publish your website
Once you finish building the website locally, it’s time to publish it.
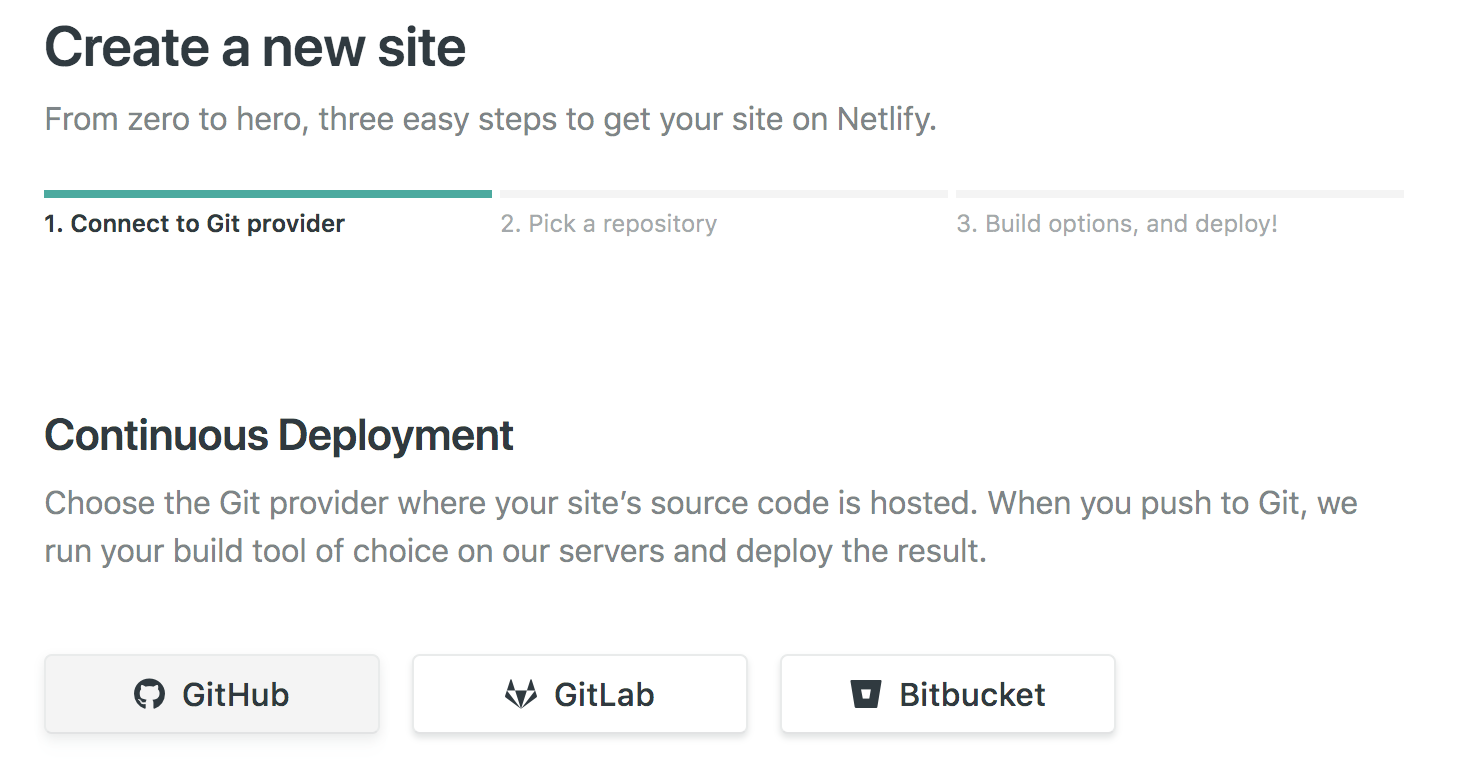
- First connect this R project to a GitHub repository. (See here for how to do this.)
- Go to Netlify, which is a website for deploying your website. Login with you GitHub account and click “New site from Git”. Follow the instructions to deploy.
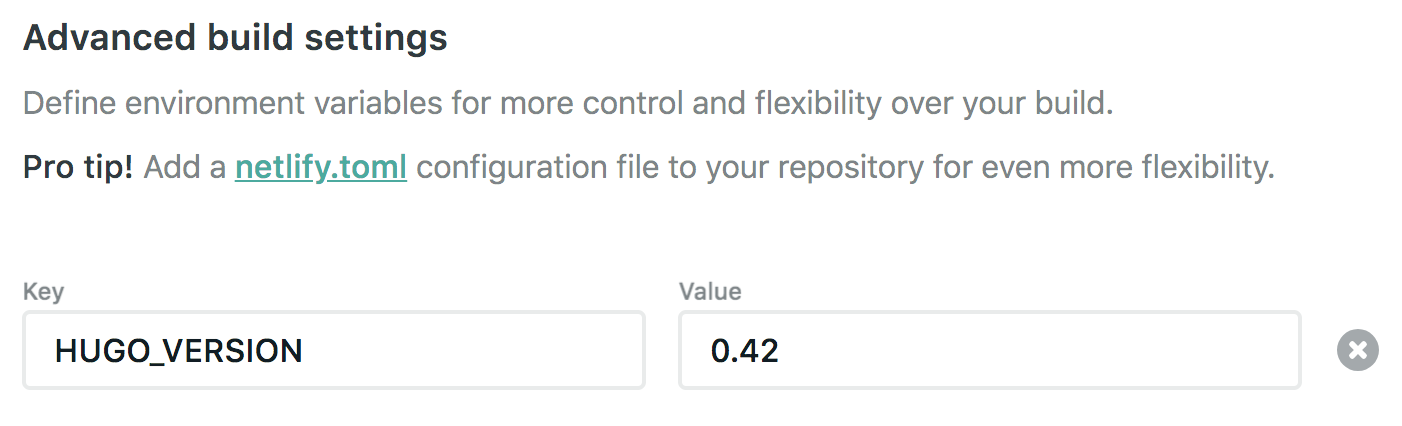
 Notice that in the last step, please make sure that the
 HUGO_VERSION parameter has the correct value, which means you need to use the Hugo version described in the theme documentation. (The Academic theme requires version 0.42.)
It takes a few minutes to deploy. Once finished, you will get a domain like *.netfily.com, where * is a random string. By visiting this address on a web browser, you will be able to see you website.
The benefit of connecting your website to you GitHub account is that, once you push a change, Netlify will catch that change in your GitHub repo and update your website automatically. This means you don’t need to deploy your website every time you make a change.
I only used Netlify for deployment, but there are also other tools available. Personally I think it’s simple and fast with Netlify.
3 Customize your domain
Having a website with random domain is not satisfying. It would be great if the personal website has domain yourname.com. For doing this, I bought such a domain on namecheap. It cost me $7.99 per year. (There are also others available.)
Then you connect your website with this domain. In your Netlify homepage, click “Domains” on the Navigation bar and the click “Add or register domain”.

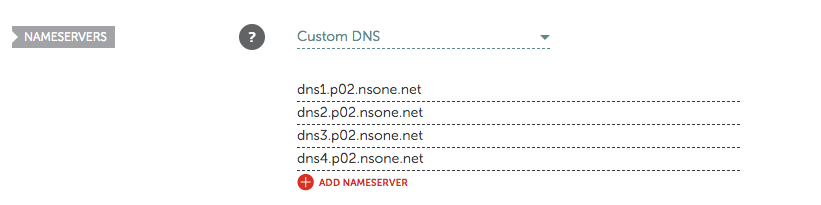
Following the instructions, you will be provided some DNS, which is used to link you website and you domain. Then go back to namecheap, enter “Domain List” and click the “manage” button of your domain. Then in the “Nameserver” panel, type the DNS you got from Netlify and save the change.
Check an hour later by using the new domain, and you will see your website!
4 Resources and tools
I learned most of the knowledge from the following webpages:
blogdown: Creating Websites with R Markdown by Yihui Xie and Amber Thomas- Making a Website Using
blogdown, Hugo, and GitHub pages also by Amber Thomas - Getting Started with
blogdownby M. Edward (Ed) Borasky
I also find some tools that are helpful to maintain a website;
- Google Analytics, which is used to track visits to your website.
Thank you for reading!
